Uploading Data Files
Creating Upload Files
You can manually enter the beginning balances, receipts and expenditures, but in almost all cases it will be MUCH easier to use the UPLOAD process to enter your financial data. The manual process can be used after uploading if you need to make minor changes to a small number of records.
The links to the upload file templates are located on the upload screens. The Receipt and Expenditure templates are not accessible until the beginning fund balances have been successfully uploaded. So if you prefer to create all of the upload files before starting the upload process, the links below can be used. Just make sure that if you chose to download the links from the application that they do not overwrite the files you have already created.
https://gateway.ifionline.org/ECA/Fund_Template.xlsx
https://gateway.ifionline.org/ECA/Receipts_Template.xlsx
https://gateway.ifionline.org/ECA/Expenditures_Template.xlsx
IT IS CRITICAL THAT EACH FUND NAME USED IN THE RECEIPT AND/OR EXPENDITURE FILES ALSO EXISTS IN THE BEGINNING BALANCE FILE EVEN IF THE BEGINNING BALANCE IN THE FUND WAS $0. If a fund name has not been included in the Fund upload file, you will receive an error message when uploading receipts and/or expenditures for that fund. If the fund names in the three files don't match, it will not be possible to compute an ending balance that agrees with your records. If you have a fund that has NO beginning balance, NO receipts and NO expenditures, do not include that fund in any of the upload files. If the fund has a beginning balance, but no receipts or expenditures, the fund will only exist in the fund upload file. If the fund has no receipts, the fund will only be included in the fund upload file and the expenditure upload file.
The receipts and expenditures files should not have any negative amounts. If you have negative receipts, they should be entered as expenditures and if you have negative expenditures, they should be entered as receipts.
All fields on the templates are required. Do NOT leave any fields blank. The data must be in the same columns as it is in the templates and the sheet names must be the same as in the templates. The sheet name is the name on the tab at the bottom of the worksheet.

It is highly recommended that the financial data be uploaded by extracting the data from your computerized accounting system rather than entering the information via the on-line screens. The fund names and classifications (source of receipts, nature of receipts and purpose of expenditure) should come from the classifications used within your accounting system.
The upload files must be Excel files of the type .xlsx. OTHER FILE TYPES ARE NOT ACCEPTED.
If the files need to be uploaded again, all data from previously uploaded files (e.g. beginning fund balances, receipts and expenditures) or manually entered will be deleted when the new files are uploaded. The previously entered data cannot be restored.
Upload File Process
From the Main Menu, select Annual Reporting.
To begin the upload process, click the "Click here to upload files" button shown below.

If you have not already downloaded the Fund Template, click on the "Click to download the Fund Excel Template" link as shown below.

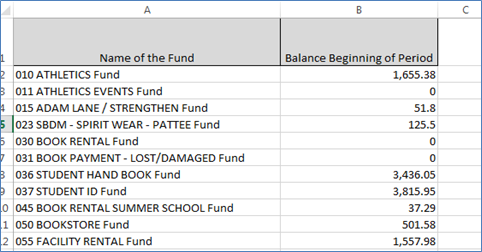
Open the downloaded Excel file named "Fund_Template.xlsx" and use it to create your upload file as shown below. You may choose to include a fund number, if you have one, as part of the fund name as shown below. This will allow for sorting the fund by the fund number. Remember to include it in the Receipts and Expenditures templates as well, if you include it in the Fund Template.

After your upload file is ready, select the "Browse" button.

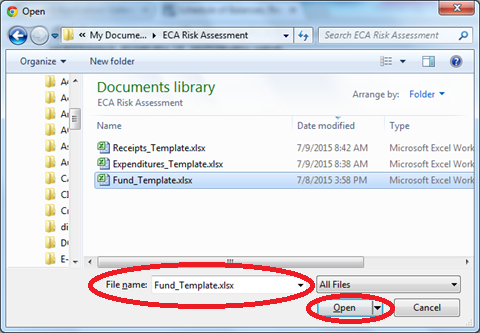
Navigate to where the upload files are stored on your computer. Select the Fund Template that you wish to upload so the name is in the File Name box and click the "Open" button.

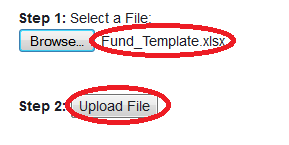
The fund name you selected will be displayed on the screen. Click on the "Upload File" button.

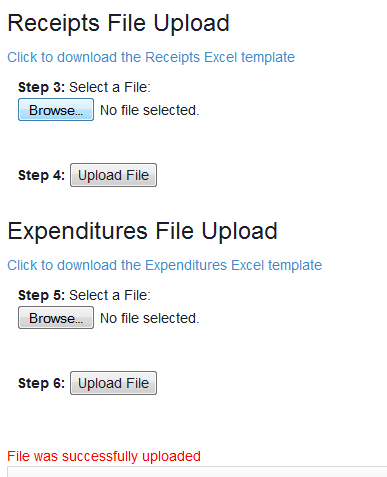
If there were no upload errors, you will see a message in red that the file was successfully uploaded. Then Steps 3 to 6 will be available to upload the receipts and the expenditures in the same manner. Also, if you scroll down the screen, you will see that the fund balances have been loaded.

Upload File Errors
If there was a problem with the upload file, you will see an error message in red that tells you what the problem is with the file. In the example below, there was a blank fund name in the file. You must review your upload file to find the error and make the necessary corrections. Then start at step 1 to upload the file again.

If you identify errors in your data after the files have been uploaded (for example, incorrect amounts or missing funds), make any necessary corrections to the upload files and start at step 1 to upload the files again.
