Gateway User Guides

Report Overview

Welcome to the guide for the SB 131 Report for Solid Waste Management Districts. This is the fifth year for the report as outlined in Indiana Code 13-21-3-13.5 as established by Senate Bill 131. This is an annual report for Solid Waste Management Districts and is due prior to March 1 of each year.

Accessing the Report

You will first need to login to Gateway at https://gateway.ifionline.org/login.aspx with your username and password. If you need any assistance logging in, please contact the DLGF Gateway mailbox at gateway@dlgf.in.gov. Once you have logged in, you will want to select the SB 131 Report for SWMDs.


You will then be taken to the Select Unit Menu which will appear similar to the Budgets application. On this page, simply click on your unit and it will take you to the next page. You will notice the year selection drop down box at the top of the page. This will be useful in the future, as you will be able to view previous year’s reports in Gateway.
                                                      

Navigating the Report


After selecting your district from the Select Unit Menu, you will be taken to the Main Menu. On this page you will be introduced to the four steps the report has been broken down into.
• Step 1 must be done first, as it establishes the funds for which data will be entered in the following steps.
• Step 2 consists of entering certain financial information that is required or helps to derive data as required by statute and also allows users to enter their revenues for the previous year.
• Step 3 allows the district to upload supporting documentation for all encumbrances the district is legally obligated to pay.
• Step 4 includes entering programmatic and per capita data.
                                                
On the left hand side of each step, you will have the ability to work on that specific step through a “Click to edit” button. The edit option will only appear after at least one fund has been added in Step 1. 

Step 1: Adding Funds

To begin the reporting process, select “Click to add funds” in the Step 1: Adding Funds section of the Unit Main Menu. 


During the first year of this report, funds had to be manually added. Funds will now carry over from the previous year. To add additional funds, select the “Add a Fund” button on the bottom left-hand side. 


Now a box will appear which will help with adding your funds. Gateway allows you to choose between adding a “Standard” fund or a custom/home-ruled fund.  Choosing the standard fund option in the first section will allow you to link your local fund with a State Board of Accounts fund. If you do not wish to link your local fund to a fund provided, you may select the custom fund type option.
The second section will prompt you for a local fund code and description. The fund code will allow up to six (6) numerical digits and the description can be anything desired.
The third section will only display if a “Standard” fund type is selected. If a standard fund type is selected, you will choose which State Board of Accounts established fund to link to the local fund you are adding. 


Once all the fields have been completed, clicking on “Add New Fund” will save the fund that has been entered. Repeat this process until all funds that contain district money have been added. If a fund was added by mistake, it can easily be deleted by clicking on the “Delete” button on the right-hand side of the fund. 


Once all necessary funds have been added, Step 1 has been successfully completed. In order to navigate through previous pages in Gateway, please use the “breadcrumbs” (green underlined links) at the top of the page. To return to the Main Menu, select “Main Menu” from the “breadcrumbs” at the top of the page. 


Step 1 on the Main Menu has now been updated to display the total number of funds. The Main Menu will display a summary of data that has been entered in each step as the remaining steps are marked as “Ready to Submit.” 


Step 2A: Expenditures and Balances

The second step collects financial information by fund and is divided into two parts. To begin, click “Click to edit Part A: Expenditures and Balances.” 


At the top of the page is a drop down menu that will allow you to choose a fund. By clicking on the downward arrow on the right-hand side, a list of all added funds will appear. Please note that each applicable field for all funds that contain district money will need to be completed. 


Once the desired fund has been selected, you can begin working on the first of two sections for Step 2A: Expenditures and Balances. This first section is entitled “Expenditure Information” and is shown below. 


Statute requires the district to report the total program and personnel expenditures per fund. By entering the total expenditure amounts in these four categories, the DLGF will automatically calculate the program expenditures by adding the supplies, services and charges, and capital outlays amounts. The personnel cost will simply be pulled from the personal services category. The personnel and program expenditures will total from all funds and appear on the Main Menu upon marking Step 2 as “Ready to Submit.”
By entering expenditures into these four categories, the DLGF will also derive the total overall and by-fund expenditures and display them on the Main Menu. 


Please note that you will need to click save at the bottom of the form to save any values
entered before navigating to the next fund.
The second section entitled “Fund Balance,” asks for the fund’s December 31 cash balance and the total amount of any encumbrances the district is legally obligated to pay. 


Statute requires a fund balance for each fund, however, this will be automatically calculated for you by subtracting the total encumbrances from the cash balance upon entering the amounts and clicking the save button at the bottom right-side of the page. 


After saving, you will return to the top, and through the select fund drop down menu, you will complete Step 2A for all remaining funds. Please be sure to click save after completing each fund. 


Once Step 2A has been completed for every fund that contains district money, you will want to return to the Main Menu. You can return to the Main Menu by selecting “Main Menu” in the green underlined links at the top of the page. 


Step 2B: Revenues

To begin Step 2B, select “Click to edit Part B: Revenues and Ready-to-Submit.” 

At the top of the page is a “Customize Revenue Codes” link that will allow revenue codes to be added to Step 2B. 


Once “Customize Revenue Codes” is selected, there will be an option to copy all revenue codes from Form 2 in the 2016 Budget and/or manually add them from a standardized list. 


The bottom section of the page can be used to manually add revenue codes to Step 2B. In order to add a revenue code, simply click “Add” on the right-hand side. 


Once a revenue code has been added, it will appear in the “Revenue Codes Selected” table near the top of this page. 


Once all necessary revenue codes have been added, please return to Step 2B to begin entering the revenue amounts.
At the top of the page is a drop down menu that will allow you to navigate between funds. Once revenue codes have been added and a fund has been selected, you will choose a revenue code on the left-hand side with the drop down menu, enter the total amount of the specified revenue received in the previous year, and click “Add” to save the information entered. Users also have the option of entering any notes.  


Once all revenues have been added for a fund, please be sure to enter revenues for the remaining funds, if applicable.
                                                                                                   

Once the revenues have been entered and saved for each fund, you will want to mark Step 2 as ready to submit by checking the small check box in the yellow Ready to Submit bar at the bottom of the page.


Once the box is checked, the section will be marked as “Ready to Submit.” At any time the checkbox can be unchecked and no longer be marked as ready to submit.
Now that you have completed Step 2 and marked it as ready to submit, you will return to the Main Menu by selecting Main Menu in the green underlined links at the top of the page. 


Once Step 2 has been marked as Ready to submit, the Main Menu displays a summary of the data entered along with the personnel and program expenditures derived from the entered data. 


Step 3: Upload Encumbrance Documentation

Solid Waste Management Districts are required to list each encumbrance that the district is legally obligated to pay and upload a scanned PDF copy of documentation that supports each one. To begin Step 3 you will click on “Click to Edit Form.” 


If your unit does not have any encumbrances, you will want to skip
down to the bottom of the page and mark it as “Ready to Submit”
and move on to Step 4.
If your unit is legally obligated to pay an encumbrance, please be sure that you have a scanned image saved on your computer to support each encumbrance prior to starting on Step 3. You will now need to complete the fields below to link the file to a specific fund and purpose. First, you will select the fund that contains the encumbrance, from the drop down menu, for which you are uploading documentation. 


Next, you will want to enter a short description or name of the encumbrance. 


Your last data entry field for this step is to enter a description of the document that supports the encumbrance. 


You will now need to choose the file you are uploading. To locate the file, click on “Choose File.” 


Once “Choose File” is selected, the following pop-up box should appear. Now you will recall where the scanned PDF documentation was saved. To view the location it was saved, please click on the “Look in:” drop down box to select the location, such as “Desktop” or “My Documents.” Next, click on the file that contains the scanned image; it should now be highlighted in blue. The file name will appear towards the bottom of the page and you can now select “Open” to finalize your file selection. 


The final step to upload the file is to click the “Upload File” button on the bottom right-hand side.


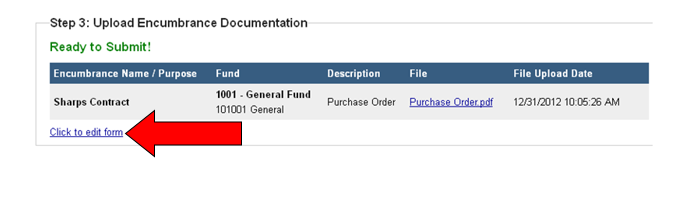
Once a file has been uploaded, a table will appear with the upload data and a clickable link to the file. To ensure the proper file was uploaded, you may select the blue underlined file link. If you uploaded another file by mistake, an upload can be deleted by clicking on the delete option on the right-hand side of the table.


Please be sure to upload supporting documentation for each encumbrance the district is legally obligated to pay. To upload documents for another encumbrance, simply follow the same steps listed above.


Once documentation has been uploaded for each encumbrance, or if you do not have any encumbrances, Step 3 should be ready to be marked as “Ready to Submit." 


You can return to the Main Menu by using the “breadcrumbs” at the top of the page. 


Similarly to Step 2, Step 3 on the Main Menu now presents a summary of the data entered. If any data needs to be updated, select “Click to Edit Form.” 


Step 4: Additional Information


The final section is entitled “Step 4: Additional Information.” This section will ask for programmatic and per capita expenditures as required by statute. To begin, click on “Click to edit form.”      


The first field asks for the “total amount of solid waste disposed in the district for which the district is financially responsible for.” To complete this, simply click in the box below and type in the total numerical amount in tons. Please note that these figures will not save until you click save on the bottom right-hand side of the form. 
                                                                                                                                       

Your next programmatic field asks you to enter the “total amount of recycling carried out in the district for which the district is financially responsible for.” Just like the previous field, simply click in the box below and type in the amount in tons. 


The next field asks for your expenditures per capita. You may want to derive this amount by taking the district’s total amount of expenditures in the year and dividing it by the total population that is contained within the district. There are several sources for population data. Population information for the various counties in Indiana can be found at StatsIndiana: http://www.stats.indiana.edu/topic/population.asp  


Once you have your expenditures per capita entered you may move onto the notes section.
The notes field below allows you to provide additional information not currently included in this report. Some examples include explaining how you came to your expenditures per capita amount, breaking down the types of recycling collected, or any other information/explanation you wish to include with your report.


In order to save the information you have entered in Step 4, be sure to click “Save” on the bottom right-hand side of the page. Once this page has been completed, it should be ready to be marked as “Ready to Submit” 


Now that Step 4 has been completed, you can return to the Main Menu by selecting “Main Menu” in the green underlined links at the top of the page.
                                            

Now you will notice that the Step 4 section in the Main Menu displays a summary of the data you have just entered, including the comments entered in the notes field. 


Signing and Submitting the Form Electronically


Once Steps 2, 3, and 4 have been marked as “Ready to Submit,” users with submission rights should see an electronic signature panel at the bottom of the Main Menu. The signature box will be invisible to users with edit or read-only rights. If you do not see this, please make sure that Steps 2, 3, and 4 have been marked as ready to submit. If these three steps are marked as ready to submit and you still do not see the signature panel, you may contact gateway@dlgf.in.gov to see who has submission rights. 


To sign and submit the form, first type your name and title into the signature box. After that, you will need to enter a four-digit PIN code. This PIN has been sent to the person with submission rights via email. You may contact the DLGF at gateway@dlgf.in.gov in case you have lost or not received a PIN. The date field will automatically populate upon submitting the form.


Once the information in all four steps have been verified to be accurate and complete, the report can be finalized by clicking on the “Sign and Submit” button on the bottom right-hand side of the page. Please note that once the report has been submitted, the report will no longer be editable, so it is important to double check your data.


Once submitted, large red text will appear that states, “This report has been submitted” and Steps 2, 3, and 4 will display as “Submitted” in green text where it once read, “Ready to Submit!”


You may no longer edit a form once it is submitted. If you have submitted a form by mistake, please contact the DLGF at gateway@dlgf.in.gov.

Viewing and Printing the Form


Similarly to other reports in Gateway, this report can be accessed in the future by selecting the desired year at the Select Unit Menu.


Gateway keeps an electronic copy of your reports for you to access at any point in time. This provides the opportunity for users to use less paper.
We also understand that there are some situations where users may want a printed copy of the report. Once you have marked at least one step as “Ready to Submit,” or even after you have submitted the report, the Main Menu summary page can be printed directly from Gateway. To do so, click the button at the top-left corner of the form that reads, “Click Here for Print/Viewing Options.” Next click on the link that reads, “View/Print PDF.”


Once you see the page appear in a new window simply click on the printer icon on the top left hand corner to print.  You may also select the save icon to the right in order to save the form as a PDF which will also allow you to email copies of your report or post them on a website.


Congratulations! You have successfully submitted your SB 131 Report for Solid Waste Management Districts. If you have any questions, please email the Gateway inbox at gateway@dlgf.in.gov.